The content of the article:
- Joystick positions
- Adjusting the cutoff frequency
- Setting up the subwoofer mode
- Loudness
The name of the car radio "Pioneer" for a modern Russian person may sound somewhat archaic for quite understandable reasons, but, nevertheless, this name speaks for itself - the first of the first.
And this is really so: the international corporation Pioneer Corporation has been providing its products to the world market with a guarantee of high quality for many decades.
Therefore, you will not have to regret the money spent after purchasing this magnificent radio. And now, it is already flaunting on the front panel in the passenger compartment of your car, you turn it on ... But what is it? Instead of high-quality music, you hear some wheezing, which does not delight your hearing at all, but rather the opposite.
So what is it? Marriage? Deception? First of all, pull yourself together and do not rush to accuse suppliers and manufacturers. The casket opens simply: your radio tape recorder needs tuning. Yes, that's the point. And since setting up a Pioneer radio is a very difficult task, we will now tell you step by step how it is done.
To begin with, let's immediately agree that we will not consider the budget options for this radio tape recorder. And this is not because of snobbishness or snobbery. It's just that budget models lack all the necessary settings, which we will talk about. Such devices can be identified by the initial numbers.
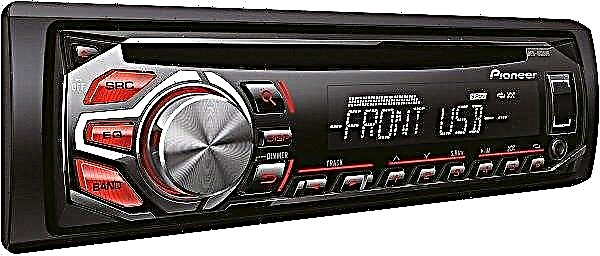
If it is 1, 2 and further, then you have a typical budget version of the "Pioneer" radio tape recorder. And you can start setting up only if you have purchased model 3100 and above. Take the Pioneer DEH 3100 radio as an example.
Joystick positions
To begin with, let's characterize all possible joystick movements. Its handle positions can be as follows:
- up;
- way down;
- to the left;
- to the right;
- recessed position.
So, let's begin. We set the volume to about 30 units, not paying attention to possible wheezing during playback. After that, drown the joystick and go to the list of settings.
You will see a large number of options here, but don't let that scare you: for now, you only need one setting. Begin to turn the joystick left or right until you find the "Audio" item. Found it? Now you need to drown the joystick again and enter the "Audio", and there you are already looking for the item in which the balance and fader are indicated. It looks like this: FADER / BALANCE.
Press the joystick again to display the inscriptions FAD 0, BAL 0. If instead of zeros there are other numbers, it's okay. It just means that there has already been a setup done here before.
If you tilt the joystick to the right, then this will switch from the fader settings to the balance settings. Rotating the joystick will allow you to adjust these parameters. At such times, the current menu will flash.
Set the fader to position + 15. In this case, sound must be passed only to the front speakers so that the rear speakers do not interfere with the front speakers setting.
Adjusting the cutoff frequency

Now we begin to adjust the cutoff frequency. Tilt the joystick to the left and exit the fader to the main menu (Keep in mind that by tilting the joystick to the left, you will always move from functional settings to main settings).
Begin to turn the joystick to find the front speaker filter adjustment. The menu for these settings looks like this: HIGH PASS FILTER. Then push the joystick in and HPF OFF appears on the screen. This alert indicates that the filter is disabled, as a result of which all the sound power goes to the front speakers, which, of course, entails unnecessary distortion.
Press the joystick again, and instead of HPF OFF, HPF 50 will appear (if this value was adjusted earlier, then the number may turn out to be different). The number 50 means that at the moment the front speakers will start receiving a signal with a frequency of at least 50 hertz. This is the frequency of the subwoofer, and it should be said that only powerful speakers can cope with it.
In order to exit the settings, use the BAND button, which is located in the lower left part of the panel. Now, by rotating the joystick and thus adjusting the volume, you can check the sound for distortion. If the setting was unsuccessful and you didn’t like its result, re-enter the filter menu and, turning the joystick, change the number to the next indicator and check the sound again.
At the same time, we note that for speakers with a size of 13 cm, you can safely set the filter parameter to 100 - 125. And if you have acoustics of 16 cm, then this value should correspond to 80.
So, as a result of the adjustment, we learned a great, purest sound, but at the same time there was a feeling that something went wrong. And all because there are no low frequencies in this sound, which is completely natural at this stage of tuning. This problem is quite fixable - you just need to switch the rear speakers to subwoofer mode.
Setting up the subwoofer mode

To customize the mode, we will have to work with the presets, which, fortunately, Pioneer has available. It is not difficult to find yourself in the menu of these settings. To do this, turn off the radio and then press the power button (top left) and hold it in this position until the display lights up. Has it caught fire? That's it, you are now in the presets menu.
As a digression, let's say that almost all the options that will be discussed below have always been on such radio tape recorders, with the difference that these settings were entered in different ways. This is either holding the joystick in the recessed position, or holding the "function" button. But at the same time, the radio tape recorder must be turned off - otherwise you cannot enter the preliminary menu.
Let's go further. So, here is a list of presets. Turn the knob to find out which options are available. There you can see the language settings, search for radio stations, enable additional inputs, etc. But you need to find the name SW Control.
To find this name, twist the crank. Found it? Very good. Then press the joystick and look at the screen. The inscription REAR SP FUL should appear on it, which will inform you that all the sound goes to the rear speakers, and we need the system to enter subwoofer mode.
Turn the knob further until FUL changes to SW. Leave it that way. With the presets, you're done. Now turn on the radio by pressing the power button. As soon as the sound appears, you will immediately notice that the rear speakers are not heard at all.
Don't be alarmed, because this is completely normal. After all, with the help of the preliminary settings, you just entered the rear speakers into the desired mode, and now they also have to be configured.
Go to "Audio" again, since now you already know how to do this. In this menu, rotate the joystick to find SW SETTING1. After that, shortly drown the joystick, and as a result, you will see the SW item on the left side of the display, and as many as three items can be displayed on the right side: NORMAL, REV and OFF. Well, everything is clear with OFF - this is turning off the mode. You won't need this function for settings.
The NORMAL command, on the other hand, means that the speakers are functioning normally when the diffuser is working upwards. REV means that the speakers work in reverse with the diffuser working down. Turn the handle to stop at any of these modes. By the way, experienced car enthusiasts know that the reverse mode is best suited for sedan-type cars.
Once you have launched the selected mode, turn the joystick to the left and exit the settings.Now turn the joystick knob to find the SW SETTING2 menu. You will find it by turning the crank to the right. This will be the next menu to work with.
Drown the joystick and light in this way on the display SW 80 HZ 0. We give the decoding: 80 - frequency filter. That is, it is this frequency that goes to the speakers. If you have them oval, then the frequency range can be limited to 50 hertz.
This cut produces a pleasantly rich bass in subwoofer mode. But if something does not suit you, then here you can experiment with different options. By turning the knob to the right, you will find the mode power level readings from -6 to +6. By the test method, select the indicator at which there will be no distortion on the speakers. That's all. The subwoofer mode setting is complete.
Exit the menu using the same BAND button. Then check the rear at different volume levels and adjust the sound power if necessary.
Loudness

I would like to finish with this, but we forgot about something - loudness. This is such a regime. It is easy to find it in the audio settings menu by rotating the joystick. Find the inscription LOUDNESS. Drown the joystick, and the same LOUDNESS will light up on the left, and three levels will be reflected on the right: low, medium and high.
This setting adjusts the high and low frequencies at low volumes. That is, the quieter the sound, the clearer the effect of this setting is. However, if you turn on the sound at full power, then this mode will not be felt at all. Therefore, you can fix a high level, which is indicated by the inscription HIGH.
Now go to the audio settings in the EQ SETTING1 menu. Push in the joystick so the display shows EQ SETTING1 and the three bar options for bass, mid, and treble. You can move through the columns by tilting the joystick to the right, and the adjustment itself is carried out by rotating the joystick handle.
Using these options, adjust the frequencies to your liking. But at the same time, we do not recommend exceeding the low frequency parameter by more than one. From 0 to 1 will be enough - take pity on your acoustics. Although, if your speakers are powerful enough, then you can experiment.
Now, perhaps, that's it. This time, your Pioneer will sound like a pro. I must say that there are still several settings left in this radio tape recorder, but they will only be needed by real music lovers with an ear for music - and this is a completely different story. We wish you a fun and safe journey!