Replacing the pump on the Priora 16 valves is a rather responsible process, because the consequences of improper assembly can be very, very sad. How to change the pump on a 16-valve Priore.

The content of the article:
- Causes of malfunctions
- Required tools
- Replacement process
- Assembly
The pump is one of the most important parts of a car. Its purpose is easy to guess. It's just a pump that drives coolant through the system. If the pump for some reason ceases to cope with its duties, then the liquid will immediately begin to warm up much more than it should be, most often it ends with a boil. By the way, the antifreeze in the system under the pressure created by the pump is approximately equal to 3 MPa, and so, at this pressure, the boiling point rises to 120 degrees.
Causes of pump malfunction on Priora 16 valves

There are several reasons why a pump replacement on a Priora 16 valve is required. In general, on engines 21126 and 21127, this is a very unreliable part, which you need to keep an eye on. The manufacturer claims that its replacement is made after 60 thousand, in fact there are cases of wear and after 30 thousand.
So, the main pump malfunctions on a VAZ 2170 Priora with a 16 valve engine:
- Leakage. Everything is clear here. It just starts to flow. It is quite easy to determine this, because there is a special hole at the bottom.
- Bearing wear. The pump begins to rattle strongly, but it is quite difficult to determine that it is she, without having the skills and dexterity. Then, after the pump has been replaced, you can twist it, usually it will be something like zips when scrolling.
- Cut off the pump impeller on the Priora 16 valves. This is also not uncommon, because it is made of plastic. Here either the blades fly off completely, or the impeller simply starts to scroll on the axis.
- Pump jammed. This is also a fairly common reason for replacement. And you will be lucky if the valve does not bend at the same time, because with a probability of almost 100 percent, the timing belt will break, even a new one.
Tools for replacing the pump on a Priora 16 valves

It must be admitted that the domestic auto industry is striving for European standards. And therefore, one cannot do with open-ended keys. To replace the pump, we need a ratchet, a torx 30, or a set of torxes, hexagons, as well as a 15 wrench and two keys for tensioning the rollers.
We change the pump on a 16-valve Priore
Of course, if we carry out work with the removal of the pump, then the first thing to do is disconnect the terminal from the battery. This is necessary in order to drain the antifreeze normally, without consequences.
Next, remove the crankcase protection. To do this, unscrew the nuts by 10 under the lower edge of the bumper, then unscrew the two bolts near the levers, and then the torcs at the edges. At the same time, we also remove the plastic flap of the right wheel arch liner.
Now, if you are not afraid, you can drain the intifreeze from the block, and for those who are afraid, we unscrew the three starter mounting bolts, and then take it aside, since there are enough wires to put it on the lever. We drain the antifreeze.
After that, we remove the plastic cover from above, it just pulls up, sits on the hairpins. Well, now we have a view of the timing belt cover. In order to unscrew it, you need a Torx 30, but the trouble is, the ratchet does not crawl under the two bolts, they will have to be unscrewed with a corner. The cover is divided into two parts, each of which can be removed without any difficulty.

Next, you need to set the piston of the first cylinder to TDC of the compression stroke. There is a dot mark on the timing belt pulley on the crankshaft. It must be combined with a mark - an ebb on the oil pump housing. There are marks on the camshafts too, they must be combined with the marks on the plastic belt cover. As for whether the Priora engine bends 16 valves - 21126 and 21127 are precisely bent valves. You can twist the crankshaft either by the pulley mounting bolt, or you can hang out one front wheel, turn on the fifth gear and twist for it.
When the marks are set, you can start removing the timing belt, for this we loosen the tension roller, remove the belt, at the same time check all the rollers, because they also need to be removed. Next, you need to remove the inner part of the plastic timing belt cover, it is held by five bolts by 10. It is necessary to remove the cast-iron outflow in advance, it is on three bolts by 1, otherwise it will not be possible to remove the cover.

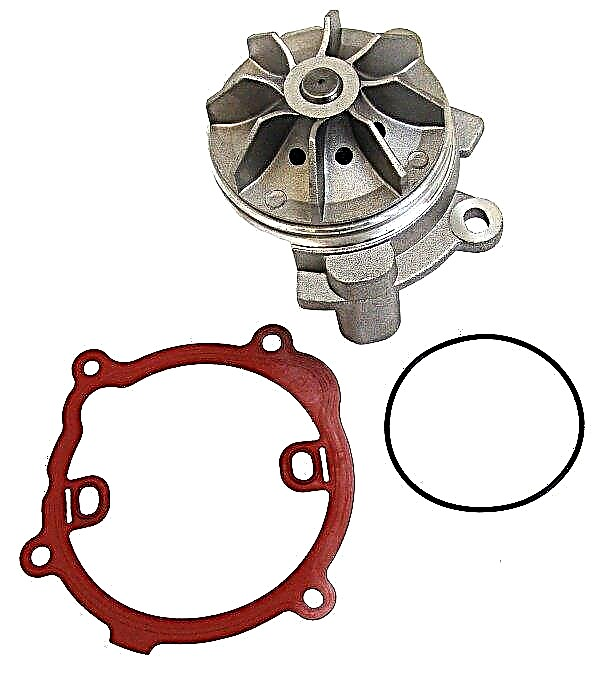
Actually, now we are starting to replace the pump on the Priora 16 valves. For this we need a hexagon. We unscrew the three bolts, then carefully loosen the pump, remove it. It is advisable to coat the joint with sealant, the gasket on both sides.
Assembly after replacing the pump on the Priora 16 valves
Nothing serious about the assembly, the main thing is accuracy. Before you put the timing belt in place, you must make sure that the labels match, this has already been said above. After the final installation of the belt, you need to turn the crankshaft by hand two turns - this is a full working cycle. If everything is fine, then we collect it with peace of mind.
WHA